Sunday 16 December 2012

Custom Quilt Set


Doll Cot Quilt Set
I doesn't quite fit this cot as it is made for a custom order
for another doll cot.
1 pink ticking matress, mini bunting for the side of the cot,
1 quilt & 1 patchwork pillow.
1 Christmas Prezzie for one little girl!

Look what I won!!
From Tikki London
They have a brick and mortor shop in London
and an online store, tikkilondon.com
12 fat 16th of Mod Century by Jenn Ski for Moda


Now all I need to do is work out what to make with it, small quilt, cushions...

Kx


Blog Hop Winners!!!!

Thank-you to all that entered 186 of you!
well 185 plus somebody on a reply, think she posted in wrong section!
Wow!!!
and if you stick around and follow me,
there will be and are more give away's in the up and coming year.

So not forgetting why you entered
1st person picked gets 9m of bias binding of choice
2nd person picked gets 6m of bias binding of choice
3rd person picked gets 3m of bias binding of choice

So 9m will bind a large quilt or make mega long bunting!
6m will bind a baby or lap quilt amd more.
& 3m will make shorter bunting, loads of hot pot mats,
every think you can bind aprons, tea cosies, skirt edges
and the list goes on....

If you are outside the UK, you are very unlikely to receive this side of Christmas but hopefully before the new year!
I will contact you - otherwise drop me an email here
blondedesign@hotmail.co.uk
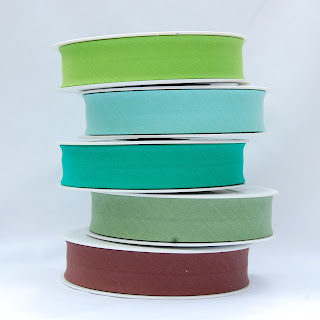
With your address! and what binding you want from the pictures,

OK
left to right
(have you every counted 154 down, ok checked 5 times to double check correct!!)

Can't seem to get the no. genoratorrandom.org to show on here!!! Boo Hoo
but these are the numbers in order 154,11,57

1st Place

love the stripes, and the dots, and all the others too!


2nd place

wow.. I had no idea this was out there.. I'm new at quilting. These are all soo pretty.. it's hard to choose, but if I had to it would be the red polka dots
3rd place

Those are great bindings! Thanks for a chance to win! :)


Have a very Happy Christmas and a wonderful new year
I will be posting again tomorrow!
kxxxx

Thursday 13 December 2012

Liberty Print Patchwork Star Tutorial

Liberty Print Fabric 
Patchwork Star Decoration Tutorial
With Christmas fast approaching, 
now is the time to add those last little touches to your home!

I have made this 5 pointed patchwork star decoration 
using 5 different Liberty Print fabrics
Starting at the top clockwise; Florabunda,  Mitsi, Wiltshire, Capel & Hera

Taking your pattern piece cut 5 separate diamonds for the front
and then another 5 for the back
Click here for the pattern download

taking 2 pieces sew together and press open

leave a 1/4" unsewn in the centre of the star
do this on all seams

Join the next piece, press open
You will now have 3 joined together

I find it easier to press seams open as shown
so you don't get a bump

Taking the last 2 pieces sew these together
and press open

Now join these 2 sets together
and press open

Last seam, join and press
it may have a little bump in the middle but this will be hidden
once stuffed and buttons added!

Repeat the steps above for the other side

I use approx 25cm of ribbon, ric rac or string for the loop
with right sides of the stars together
insert the loop from where you want your top of the star to be.
 In between fabric with the cut edges hanging out, pin

Sew all edges together leaving a small opening,
I tend to leave the opening one one of the bottom edges.
Cut off the excess fabric on the tips

Turn right side out and fully stuff
slip stitch the opening closed

Find two cute buttons, and the longest needle you can find
I broke into my Pin Cushion Button Jar that I purchased in Liberty's!

Sew a couple of stitches pulling tight before sewing on a button on each side
Now you are finished!

I have been lucky enough to be featured in The Liberty's Blog on their website
with my Elf Stocking tutorial
Excited, its like Christmas came early!!
I would love for you to take a look
There are also other tutorials for you to try out.

And if you are looking for gifts for her your wonderful wife, girlfriend or lover!
Then check these out, but as I am the one most likely to be in Liberty's buying, I can buy these for myself (Shhhh!)......

Kx

Sunday 9 December 2012

MY GIVEAWAY BLOG HOP PARTY

Blog Hop Party with Give-Aways

Quilters Fun is hosting a blog hop party with a tons of people doing give away's
The above picture links you back to all the other people involved
blogs you can visit to join in and see if you can win anything

NOW CLOSED

I am also involved and am hosting a give away!!!
Not just one but 3 give away's!!!

1st picked - 9m bias binding of choice
2nd picked - 6m of bias binding of choice
3rd picked 3m of bias binding of choice

(note metre is longer than yard)

I have over 60 different bindings you can choice from
all 25mm single fold 100% cotton
Perfect for quilts, mats, coasters, cosies, skirt edging & bunting.
You check them out on my Etsy page

To win all you have to do is leave a comment below.
Please leave only one comment, per person.
Any duplicates will be deleted, when I do a rendom number picker
Winners will be picker on 15th December.

Good Luck, and I will leave you with some photos of bindings!


Give away winner

WINNER OF THE ELF STOCKING GIVEAWAY
IS GILL NUMBER 3 ON THE NUMBER GENERATOR
I WILL CONTACT YOU FOR YOU ADDRESS

ALSO EVERYBODY I AM JOINING IN THE BLOG HOP GIVEAWAY
STARTING IN A FEW HOURS
I WILL BE GIVING AWAY SUPPLIES
BIAS BINDING

KX

Wednesday 5 December 2012

Elf Christmas Stocking Tutorial & Pattern


Elf Christmas Stocking Tutorial & Pattern

These shown are in Liberty Print Fabrics

As promised a tutorial and downloadable pattern,
for you to scale to what ever size you want your stockings.

Also a reminder I am also giving away one of the stockings,
it is open to anybody anywhere in the world!!
all you have to do is go to the previous post
leave a message and I will be picking a winner on Sunday.
The Tutorial
I used approx FQ to 1/2 metre/yard of fabric on these
And used 4 different fabrics
2 pieces for the leg
2 pieces for the toe
2 heel pieces
1 piece for the cuff
PLUS batting or thin wadding
optional cotton lining inside same size as batting
(so it is sandwiched, you can also buy cotton backed wadding)
TIP: if you don't have either of these and want to use up those craft things you have been hoarding, you know that 1/2 metre of felt you have hanging around!
Then use this to bulk it out, after all, its not a quilt that is being washed all the time.
First cut out your paper pattern 
Then cut out your fabric pieces
2 x leg
2 x toe
2 x heel
1 x cuff on fold 
Taking one toe piece & leg piece
match up 
On join, fold right sides together
(hard to see on the Tana lawn fabric! sorry!)
Pin
NOTE: see the 1/4" overlap at edges.
You will sew a 1/4" seam, so this overlap will help prevent it being off centre
sometimes only practice makes sense on this when you open it out and iron.. 
Open out and iron
I still have unmatched seams on the left,
but don't worry it will be trimmed up later 
repeat this for the other side of the stocking
Next lay the cotton white fabric right side down - if using
then the batting, wadding or elt (what ever you have to hand)
Then one of the the stocking sides face up
then lay the heel in place, pin.
First I using a zigzag stitch sew the heel in place,
this also prevents fraying
Then I freehand quilt the rest of the stocking,
if you don't know how or do not have a machine foot to do this
then just straight line stitch at  a random intervals across the stocking.
Next after sewing both sides cut around the edges.
You should end up with something similar to the above photo. 
With right sides together line up your heel
Pin,  sew around the edge with a 1/4" seam, leaving the top end open 
Before turning, snip into all the curves 
and snip away fabric at the curly toe
Turned stocking
TIP: push the toe out using a large knitting needle.
just be careful not to push the needle through the fabric.
Then put to one side.
Taking your cuff piece of fabric opened out 
notice longer edge along top and bottom
shorter edge left and right
Fold in half
shorted ends together, and right sides together,
sew down what is now the longer side,
shown on the right side of this photo,
turn right-side out, you will have a tube, iron flat the seam
Then turn up, so both raw edges are toether 
A closer look of the other end
then iron flat again 
We are now on the home straight!
Taking your stocking and cuff piece
as shown 
place your cuff inside the stocking and pin.
All your raw edges will be together 
You stocking maybe large enough to go around the bottom of your machine,
The way you may sew a leg hem.
if you remove the attached plate,
If not careful sew with the cuff above the machine
(I will add a photo as reference as this is what I did)
Then over-lock the seam, and trim
Pull the cuff out from the inside 
And fold the cuff over the stocking leg
Iron.
Last thing to do is stuff to the toe add a jingle bell, 
then a piece of ribbon and optional button at the top for hanging  and decoration.
You are now all finished!
For these I used Libery Print Fabrics
For the pattern
If you have problems
email me at blondedesign@hotmail.co.uk